
Click HERE to return to the contents page
[Time: 42:39 min.] [Time: 19:05 min.]In this session, we will explore the 4 types of Bills of Material to see how they work in Sales and Production.
This item can be set up with a template Bill of Materials that will allow you to substitute components in a Sales Order.
BOM Types:The Production Bill of Materials is used in the Production Order.
The parent item is a finished material, and the children are the components. Example: Printer = Printer Head (1 pc.) + Memory Board (2 pcs) + Power Pack (1 pc.)
During the Production process, you turn the components into the finished product.
The Sales Bill of Materials is used in Sales documents. One example is a gift package that contains multiple products.
The parent item will be the package name, and the children will be the inventory items inside the package. Once you select the parent in a Sales Document, all its children appear as sub-items.
The Assembly Bill of Materials is similar to the Sales Bill of Materials. It represents a collection of individual items in a set with specific price.
Unlike the Sales Bill of Materials, only the finished product appears in the Sales Order document; the components do not appear as sub-items.
The template Bill of Materials has no restrictions. It can be used in sales and purchasing document as a way bring in a list of items. Once you select the parent item, all its children appear. You can delete, add or duplicate rows and make any modification as necessary.
Steps to Create a Bill of Materials
Create an item for the parent
Create items for the children
Create the Bill of Materials
Take the following steps to create a Bill of Materials:
First, create Item Master Records for the finished products in the system. These
are represented by the parent item in the Bill of Materials.
Create items for all the children, if they do not already exist in the system.
Then Create the Bill of Materials
Item Category Rules
Category of the Item Master Record of the Parent Item in Bill of
Material
Depending on the Bill of Material type you must have a certain category maintained in the Item Master Record of the finished product.
For the Production BOM the finished product has to be an
Inventory Item.
If you also want to purchase this item, you can define it as a Purchased Item.
If you also want to sell it, you can also define it as a Sales Item.
If you produce it for stock, as a component of another parent item, then not
define it as a Sales Item, so it will not appear as a choice in a sales document
list of items.
Templates can have any of the three attributes (Purchased,
Sales, and Inventory Items).
The components for Sales BOMs and Assembly BOMs must be Sales Item.
Generally they are also Inventory Items
For the production and template BOMs, the components can be any of the 3 categories. All components can be set up purchasing or selling separately.
True for Both Sales and Assembly Bill of Materials
Both the Sales and Assembly Bills of Material are used for kits where the parent item is for sale, but not stored in Inventory.
The child items are set and not changeable, although you can change the quantities for both the parent and child items.
Let's view a demo of how to create a sales Bill of Materials and see how it is used in a Sales Order.
I want to define a Sales BOM for deluxe PC set. First I will create a parent item.
To set the category of the item to be appropriate for Sales Bill of Materials, I will uncheck Inventory Item and Purchased Item, leaving only Sales Item checked.
Production > Bill of Materials
BOM Type: Sales
Hide BOM Components in Printout
I can copy the total of the component prices into the Product Price field by selecting the arrow above the Product Price field.
You can see both the header item and the components in he Order.
If I change the quantity of the parent item, notice that all
the child items change quantity also.
Additionally, I can change the quantities
of child items.
However, I cannot substitute any of the child items.
Now I will set the configuration so that the price is taken from the components.
Administration > System Initialization > Document Settings >
General tab.
For a Sales BOM in Document, Display:
● Price and Total for Parent Item Only or
●
Price for Component Items
We change the settings to only show the component items and save the setting.
The template Bill of Materials is the most flexible Bill of Materials type. It allows you to copy a list of items into a sales or purchasing document quickly and easily.
You enter the parent item into document and all the child items are automatically copied into the document.
Template Bills of Material are useful if the composition of the products you sell is generally the same, but can vary slightly.
You can make any changes you need to the templates in the Sales Order.
You can delete individual items, replace them with other items, or change the quantities.
Now let us go into system to view how a template Bill of Material works.
[There are no speaker notes available for this demo]
Process flow
The use of a Bill of Materials in the Sales and Production Process
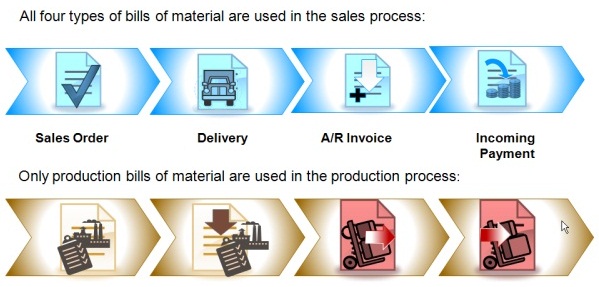
All 4 types of Bills of Material are used in the sales process. The parent item is entered as a sales item in a sales document.
Only Production Bills of Material can be used in the Production process. The Production BOM is the only type used in the MRP run and it is always used in standard Production Orders.

In a Production Bill of Materials, the parent is the final product of production.
The child items represent the components used to produce the parent. The parent item is entered into Production Orders with a quantity to be produced.
The Bill of Materials for hat item will default into the Production Order with the appropriate child quantities.
The issue method of the parent item is used as a default for the child items.
After the Production Order is Released, the child items can be issued to the Production Orders.
When you record completion of the Production Order, the parent item is received into Inventory. A Production Order increase the quantity of the parent item and decrease the quantity of the child items.
To sell the parent item, enter it as you would normally enter any item in a sales document. As usual, when the item is delivered, the parent item quantity is released from the warehouse.
You can decide to purchase the parent item as a regular item rather than production the item.
Generally, child items in a production Bill of Materials are defined as Inventory items.
However, you can use labor items as child items to add additional costs to a Production Order. These labor items are not defined as inventory items.

Components can only be issued when the status of the Production Order is set to Released.
Your issue component items using either the Manual or the Backflush method.
The Manual issue method means that you issue individual component items to the Production Order. This enable you to post components issued to a Production Order precisely when they are required in the Production Process.
Manual issue is always used for serialized or batch-managed items.
When you use the Backflush issue method, SAP Business One automatically issues item transactions for the needed child items when a product is reported as completed. Items that are set to Backflush are issued automatically when you chose Report Completion.

A phantom item is a sub-assembly in the BOM that does not actually exist in inventory. It is used to simplify the Bill of Materials.
Although the phantom item appears in the Bill of Materials, the Production Order will show the components needed to make the phantom item rather than the phantom item itself. An item can be defined as a phantom item in the Item Master Data by selecting the checkbox "Phantom Item".
When you run MRP, the system will explode the phantom items and create recommendations for its components.
The phantom item will be displayed in the MRP result window without recommendation, for information only.
A phantom item is ignored in a Production Order. The Production Order will explode the phantom BOM and displays its components in the required order.
In the example above, in the Production Order, the components tire, rim and screw will appear, but not wheels.
As long as the item is linked to a Bill of Materials, its status cannot be modified.
Now let us take a look in the system at a production Bill of Materials.
[... no speaker notes available]
Production Process [Time: 23:34 min.]
During this course, we will explore the steps in the production process and vie4w the effects of the Production Process on inventory and accounting.
Imagine that: Your company manufactures technical items such as printers. Each printer requires assembly of several components. Therefore printers have Bills of Materials for Production.
When a Sales Order comes in for the printer, you create Standard Production Order and link it to Sales Order.
If a printer is returned, a disassembly Production Order can be used to dismantle the item and return the parts to stock.
If a custom item is produced, a special production is used.

If a custom item is produced, a special Production Order is used.
The production module in SAP Business One is useful for companies that do light assembly process, or sell items in bundles.
The finished goods and the components are set up as items in the system. Then a Bill of Materials is created with the finished item as the parent and the components as child items.
Additionally, labor can be added to the Bill of Materials as a component. Labor is represented as non-inventory item with the item type set as labor and standard cost is assigned. The Production Order brings everything together to produce the parent from its components.
The calculation of the finished goods cost includes the material and labor items.
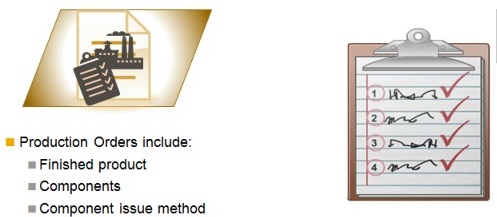
Production Order is the main document in the Production Process.
Basically, a Production Order is a command to produce or repair an item.
The Production Order support the planning and assembly of this item. It also tracks all the material transactions and costs that are involved in the production process. The Production Order records the finished material to be produced, its components and their issue method.
It also tracks all the material transactions and costs that are involved in the Production Process.

There are 4 steps in the Production Process:
1. Production Order can be created automatically by MRP or you can create them manually.
In the make-to-order process, a Production Order is created manually for each Sales Order that creates a demands.
When you create Production Order you select a Bill of Materials for production the finished item. You then can adjust the components
as needed.
You enter a due date than represents the completion date for the
project, the date when you want the finished items to be received into the
warehouse.
2. Release. Before work can be done, Production Orders must be Released. At this point, the Production Order can begin collecting the cost of production.
3. Issue Components. Components ca be issued when they are used, or set as Backflush so that they automatically issued at the end of production.
If you are using Perpetual Inventory, a Journal Entry is automatically posted when components are issued to the Production Order.
4. Report Completion. When all work is done, you report completion of the Production Order. At this point, the finished items are received into warehouse.
You can change the Production Order Status to Closed. Even after the Production Order is closed, details on the Production Order costs can be found on the Summary.

SAP Business One has 3 types of Production Orders to support the variations in Production:
The Standard Production Order is based on the Production Bill of Materials; you use it to produce a regular Production item. Once you add the parent item to the Production Order, all the components fill in automatically. You can change components during production, if needed.
You issue components from inventory to the Production Order. A labor item represents the labor used in Production the finished Goods.
After production is completed, you receive the finished parent product into inventory.
Use the Disassembly Production Order to disassemble a parent item of a regular product into its components. You disassemble the product into separate parts that can then be put into stock and sold. For example, you can purchase a used car, take it apart, and sell the individual components.
In this case, the parent item is issued to the Production Order, and the disassembled sub-items are received into inventory at the end of production.
Use the Special Production Order to produce and Repair items or to perform activities that are not necessarily Bill of Material items. For example, you might use the Special Order as a repair Order Customer Equipment Cards or rejected assemblies.
The finished item can be any inventory item. You do not use a Bill of Materials in a Special Production Order, instead you enter the components manually.
You issue components from inventory to the Production Order as normal and ultimately you receive the finished item to the Inventory.
Steps to Create Production Order
Take the following steps to manually enter a Production Order:
Now, we will demonstrate the steps to create a Production Order manually for 5 printers.
Let's take a look at the Bill of Materials used to make this finished item.
Production > Bill of Materials
Enter product No. The choose Find.
Here is the Bill of Materials for the Printer
We can see the components used to make the printer and we can see the quantities needed for each component.
What issue method is set for the components to the order? The Issue Method is Backflush. This means that the components will be issued automatically when I report the completion of he finished product.
How I would like to see how many of the printers and
components are currently in stock.
Inventory > Inventory Reports > Inventory
Status
Now I am ready to create the Production Order.
I create the Production Order for 5 printers:
Production >
Production Order
First I will set the type for my Production Order to Standard. Standard is used for basic Production Processing where a Bill of Materials is used to build a finished product. The other possible types are Standard and Disassembly. The type can only be changed when the Production Order is Planned Status. Notice that the initial Status is Planned.
Before we are ready to manufacture the item, we will change
the Status to Released.
No items can be issued for Production until the Order
Status is released.
This is a usually done after a responsible employee review the Production Order and approves it.
I enter the finished product that I want to manufacture. This automatically loads the components from the Bill of Materials that we just viewed.
I will enter an appropriate due date for the document.
The warehouse shown is the warehouse where the finished product will be received when production is completed.
Notice that the origin is shown as Manual. This appears when a Production Order is created by authorized user directly rather than being created by a materials requirements planning run.
Even if this order had been created by MRP - it is still possible to change the value of some of the fields in the document.
If this Production Order were related to a Sales Order - we can link the Sales Order using the Sales Order field. You can choose a Sales Order from a list of Sales Orders. When you choose a Sales Order, the customer automatically defaults into the customer field.
Let us take a look at the components. These were automatically copied from the Bill of Materials associated with the finished product we entered in the order.
You can add additional items to the Production Order.
The Base field displays the quantity of the components necessary to manufacture the finished goods as it was entered in the Bill of Materials. In this case, the quantity was set to 1.
The Planned field displays for each component the planned quantity which is a multiple of the base quantity and the Product Planned quantity. Nothing is whowing in the issued field, because we are still in the planning stage for the Production Order.
We must set the status to Released before we can issue components to the order.
The available field shows quantity available in the selected warehouse.
The issue method shows as Backflush because that is what was set originally in the Bill of Materials we viewed. You can change the issue method if the order is in the Planned or released status, as long as that particular component was not issued yet.
A newly created Production Order has the status Planned. In this status, you cannot issue components or report completion of the Production Order. However, you can make changes to the information in the Production Order such as components.
Once the Production process begin, you open the Production
Order and change its status to Released.
Once the Status has been to Released,
you can:
- issues components
- receive the finished item into inventory, and
- report completion for a Production Order.
In both status Planned and Released, you can change, add or delete components as long as they have not yet been issued.
As long as the status is Planned or Released, and no transactions were posted to it, you can manually cancel a Production Order.
We move the Production Order status from Planned to Released.
Production is ready to start for our printers. I need to release the Production Order to the shop floor.
There has been a change in requirements for components in the Order. Then I go to the Components tab. I need to set one of the components for a manual release. Manual release allows me to be in control of the quantity of the components and the timing of their use.
Now I will change the Status from Planned to Release.
As mentioned before, components can only be issued when the status of the Production Order is set to Released. You issue component items using one of two methods: the Manual method or the Backflush method.
With the Manual method, you issue individual component items to the Production Order as they are needed. You control the quantity of the item that issued to the Production Order.
The Manual method also enable you to post components issued to a Production Order precisely when they are required in the Production Process.
Manual issue is always used for serialized or batch-managed items because the serial or batch numbers must be specified when the items are released.
Backflush is a way to automate issuing components that you know you always use and you are sure of the quantity.
For example, you might always use a certain amount of oil in Producing an item, rather than measure the actual quantity, you can set the standard quantity to Backflush.
SAP Business One automatically issues item transactions for the Backflush component items listed in the Components tab when you report completion for Production Order.
Labor items are automatically set to Backflush. Note that items that are managed with Serial Numbers or batch numbers cannot be backflushed; therefore, they are automatically set to a manual issue method.
Now we will see how to issue components Manually to the Production Order.
Then I right click and choose Issue Components. This option appears only if the Production Order has been Released [and at least an item component has a Issue Method Manually]. The items to be issued manually appear in the Issue for Production window. The quantity that appears is the quantity listed in the Production Order.
I am going to issue on additional piece of one of my components in additional to the quantity listed in the components tab by increasing the quantity to be issued here.
This way you can see how the system records variances.
I can for to the summary tab to view how the Production Order tracks what has been used and the costs.
I can see the actual quantity of components that issued along with the costs. At this point, the entire component cost shows as a variance, since the parent costs is not calculated yet. Once I report completion of the Production Order, only the additional piece will be presented as a variance.
I can choose to issue manual components for multiple Production Orders at once.
Production > Issue for Production. I press Production Orders [in Issue for Production window] and I see all the released Production Orders that contain manual components.
When you report completion, the system automatically:
For Standard and Special Production Orders, reporting completion posts the finished product to the Inventory.
However, for Disassembly Production Orders, reporting completion posts the components to the inventory.
At this stage, you could also reject items if the products are defective.
Serial Numbers and Batches can be assigned at this point to the finished goods item.

In a Standard or a Special Production Order, components are committed to the Production Order when the Order is saved in the Planning stage.
At that point, the finished product appears on Inventory Reports as "Ordered" and "Available" for Sales Order.
When the components are issued, they are removed from stock and consumed by the Production Order. At this point, they no longer appear as committed in Inventory Reports.
When the Production Order is reported as complete, the finished product is received in stock.
For Disassembly Production Orders the stock effect is reserved.
The disassembled finished product is removed from stock and the components are added into the inventory when to disassembly Order is reported as complete.
Now we will look at how to record completion to receive the finished product into Inventory.
I have received a message from production that all 5 printers are finished, so I need to report the full completion of the Production Order.
Then I right mouse to Open the context menu. I then choose Report Completion to receive the finished product into inventory.
The Receipt for Production window opens. You probably notice that this window is similar to the Issue for Production window in the previous demo.
You see a document number, a posting date, and a reference field at the top. At the bottom you have 2 fields which allow remarks.
Once again, the Production Order number is displayed, but this time we see a line with the finished item instead on the components.
The type field has 2 options Complete or Reject. You choose Complete to indicate successful production of the finished items and to receive the item into the warehouse. You would choose Reject to reject a damaged final product.
Note that even if you reject the item, it is still entered into inventory and the Backflushed components are still removed from inventory. Because of this, we recommend that you use a special damaged goods warehouse to receive rejected items.
The Planned quantity appears in the quantity field, but it can be changed to an actual quantity that is received from production.
If this were an item managed by Serial Numbers or a batch, I could do that at this time. I would right click to bring up the context menu to assign the appropriate batch or Serial Numbers. The warehouse column shows the warehouse where the finished item will be received.
When you click on Add, the finished product will be received into inventory.
At his point, all outstanding components with the issue method Backflush will be issued to the order.
The system calculates the costs to produce the finished item.
I choose Add in the Receipt for Production window, and then accept the system message.
Since Production is complete, I will change the Order status to Closed. Once I add the Production Order with the Closed status, the Order cannot be modified.
Let us take a look at the Summary page. The actual product value has now been posted - this is the value of the finished product received from inventory.
You can click on the link arrow add this will take you to the Inventory Posting list by Items window.
The document number shown is the receipt from Production document.
The total variance field will show the difference between the actual components value and the actual products value. The variance pe product shows the total variance divided by the quantity of the final product received.
% variance, shows this as a percentage.
Total cost for labor items appear in the Actual Additional Cost field.
Since we are managing our stock with Perpetual Inventory method, a Journal Entry is created for the variance. This Journal Entry can be viewed by choosing the link arrow next to the Journal Remark field.